Introduction
The TextUs Next Slideout Chrome Extension is a tool that allows you to pull contact names and phone numbers directly from your CRM or ATS into TextUs. If you have not installed the Chrome Extension yet, you can find instructions on how to do so here: How to Install the TextUs Next Chrome Extension.
Quick Start Training Video
How to Open the Slideout
By default, once the Chrome Extension has been installed a slideout "sticky tab" will appear on the right of every new Chrome tab window that is opened.
If you wish to block the slideout from certain websites, click on the TextUs Next icon to the right of your Chrome URL search bar and toggle the "Block Slideout at..." setting which will turn off the sticky tab for that website.
To open the TextUs Next Slideout Chrome Extension, click on the TextUs Next icon to the right of your Chrome URL search bar and click "Open Slideout."**
This will present you with the slideout login page. Clicking “LOGIN” will redirect you to the TextUs Web Application to log in.
Once you are logged in you can return to the slideout.
* Note: Currently sticky tabs will always show by default if you have the Chrome Extension installed. An enhancement is currently being developed to only show sticky tabs when you are logged in to TextUs.
**Note: There is also a keyboard shortcut you can use to open the slideout: [Shift] + [Ctrl/Cmd] + [S]
Upon returning to the Slideout you will notice you are now logged in. The default section of the Slideout will be your inbox. If you are assigned to multiple accounts your default account will appear. See further below if you wish to switch accounts.
The slideout can be minimized to the side of the page by clicking on the TextUs icon. To reopen the slideout click the TextUs icon again.
How to Switch Accounts
If you have access to multiple TextUs accounts, you can easily switch between them by clicking on the current account and using the dropdown to make your selection.
You can also switch accounts by clicking on the notifications icon.
How to Open the TextUs Web Application or Contact Support
You can open the full TextUs Web Application in a new tab as well as Contact Support from the 3 vertical ellipses on the far right of the slideout.
How to Find Numbers
To utilize the find numbers function of the Slideout, first ensure you are on a supported web page, then click the magnifying glass icon in the upper right corner of the Slideout next to the notifications icon.
This will bring up the list of contacts and associated numbers found on the supported page.
You may also now find numbers using the ‘Find Numbers’ ability from the Chrome Extension menu (or by keyboard shortcut), which will open the Slideout and bring up the list of contacts and associated numbers found on the supported page.
How to Send a New Message
After finding numbers on a page, you can select the numbers (maximum 10 for quick compose, see How to Send a Campaign for more than 10 contacts) in which you wish to send a message and then click the send message paper airplane icon.
This will bring up the message composition box. You may choose to type your own message or click the plus button to select and insert a template (Click here for information on creating templates) and select the paper airplane icon to send.
You can also compose a new conversation without first finding numbers by clicking on the blue paper airplane icon in the lower right-hand corner of the Slideout.
From here you can select a contact from the list or search for contacts. See below on how to add a new contact if needed.
Once you select a contact, you will be presented with your conversation history if one exists. You have the same options as above to compose a new message or insert an existing template.
Lastly, you can also open any existing open conversation by clicking on it within your inbox or other folders.
How to Send a Campaign
After finding numbers on a page, if you select more than 10 numbers (11+), the quick compose paper airplane will grey out and you will now be able to select the campaigns icon

After selecting 11+ contacts and clicking the icon, your contacts will be imported and will be presented with the option to send a campaign. You may choose to send the campaign immediately or schedule it for another time.
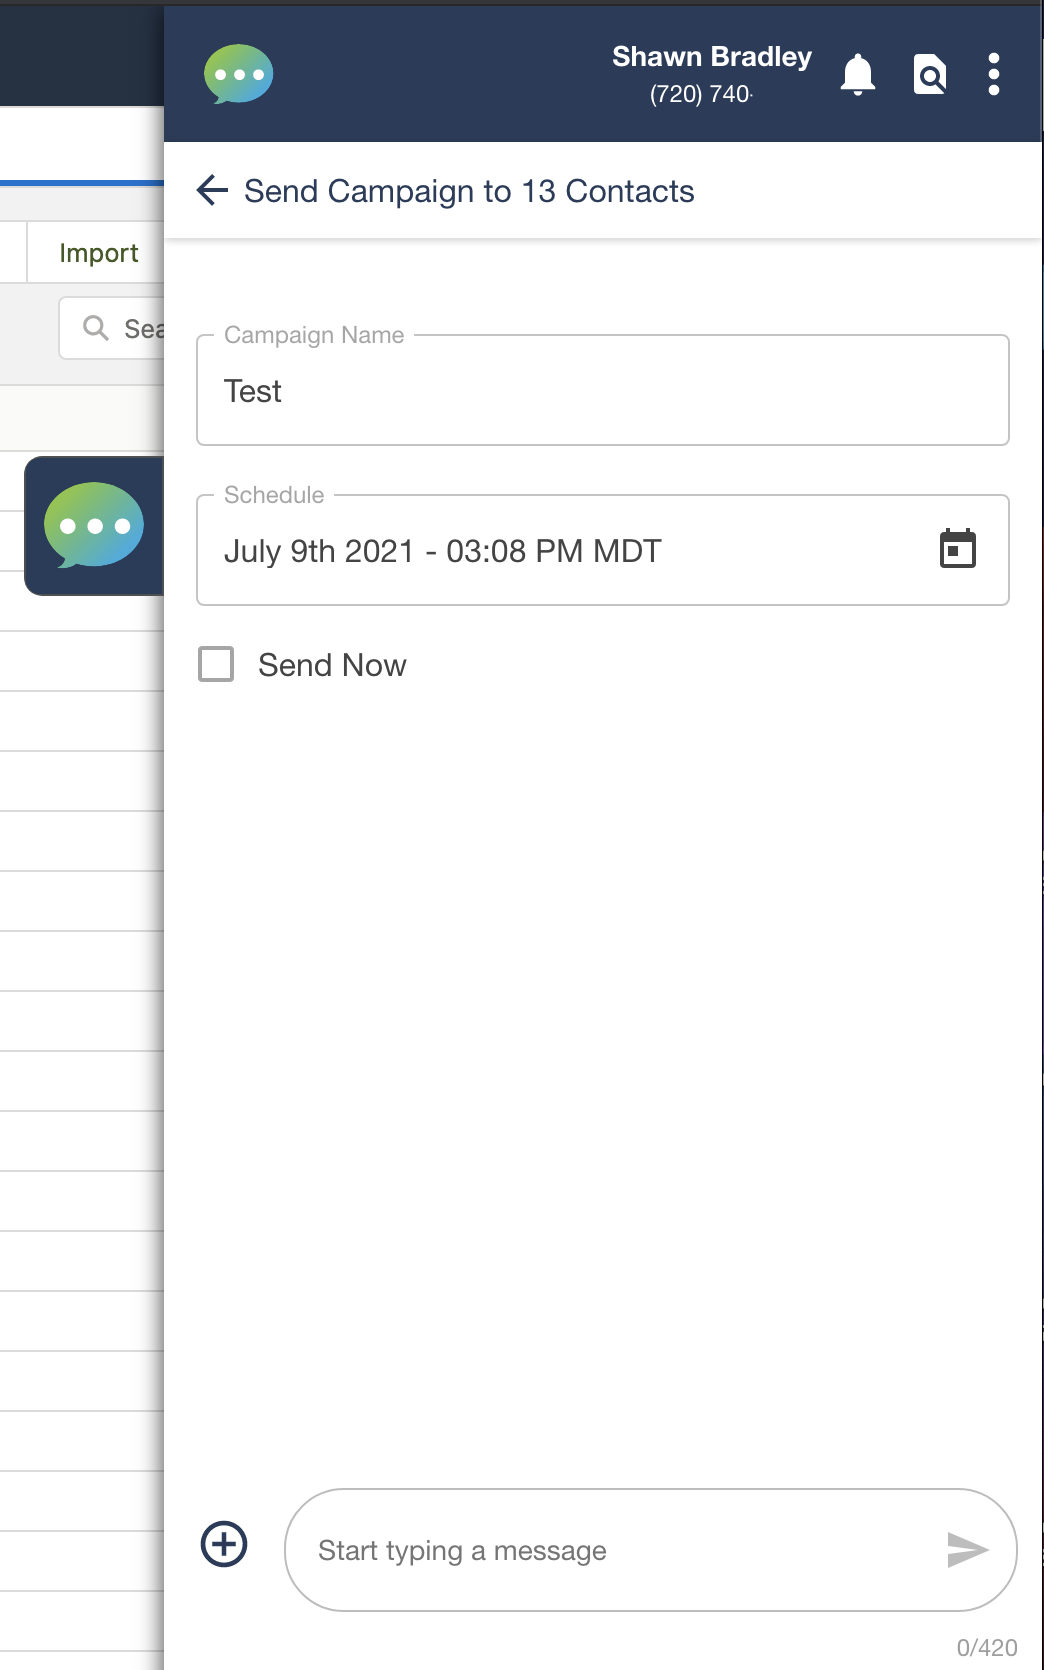
The initial number of contacts selected may be different than the total number of contacts who receive a message. Contacts will be omitted from a campaign’s recipient list due to having opted out or deemed un-messageable.
How to Add Contacts
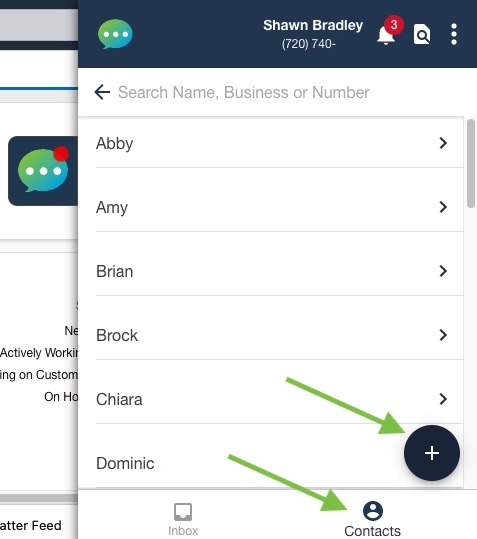
To add a new contact first click on the Contacts section of the Slideout. Once on the contacts page, click the blue plus button to add a new contact.
You can also edit existing contacts by first clicking on their name in the contacts list and then clicking on the pencil icon within their contact page.
Tip! You can call or send messages to contacts right from their contact card as well!
How to Filter Messages and View Different Folders
In your Inbox, click the inverted pyramid in the upper right-hand corner. This will populate a new page allowing you to add a filter to your inbox or select another folder to view.
To apply a filter click on the open box next to your desired filter. After doing so, page back by clicking the filter arrow in the left-hand corner of your slideout. To turn off the filter, return to the filter section and deselect.
To view different folders, click the desired folder, and then click the filter arrow to view your selected folder*.
*Please note that currently after selecting a folder and clicking Filter to go back, the slideout will still indicate that you are in your ‘Inbox’ as the header, but your filter will appear in smaller text below the header.
Closing Conversations from the Slideout Chrome Extension
The Slideout Chrome Extension does not currently support closing conversations, however this functionality is being added in the near future.
Currently closing conversations will still need to be done in the web application. However, if you search for a closed conversation and send it a text the conversation will reopen and be visible in your Open Inbox folder.
Difference from TextUs Next Popout Chrome Extension
The Slideout Chrome Extension is a lighter version of the Pop Out Chrome Extension that lets users quickly find numbers and easily maintain 1 to 1 conversations without leaving their existing workflow within their CRM or ATS.
The Popout Chrome Extension is still available from the same menu you use to open the Slideout in the upper right-hand corner of your Chrome Browser. Once you have clicked on the TextUs icon in the upper right your first option is “Open Popout” You can also use keyboard shortcuts.
Please see our Popout Chrome Extension help article for more information.